Once registered, you can access your FreightExchange account to add or edit your ABN, add your head office address, enable delivery date on bookings and define label settings.
Step by Step Guide
To access your company setup:
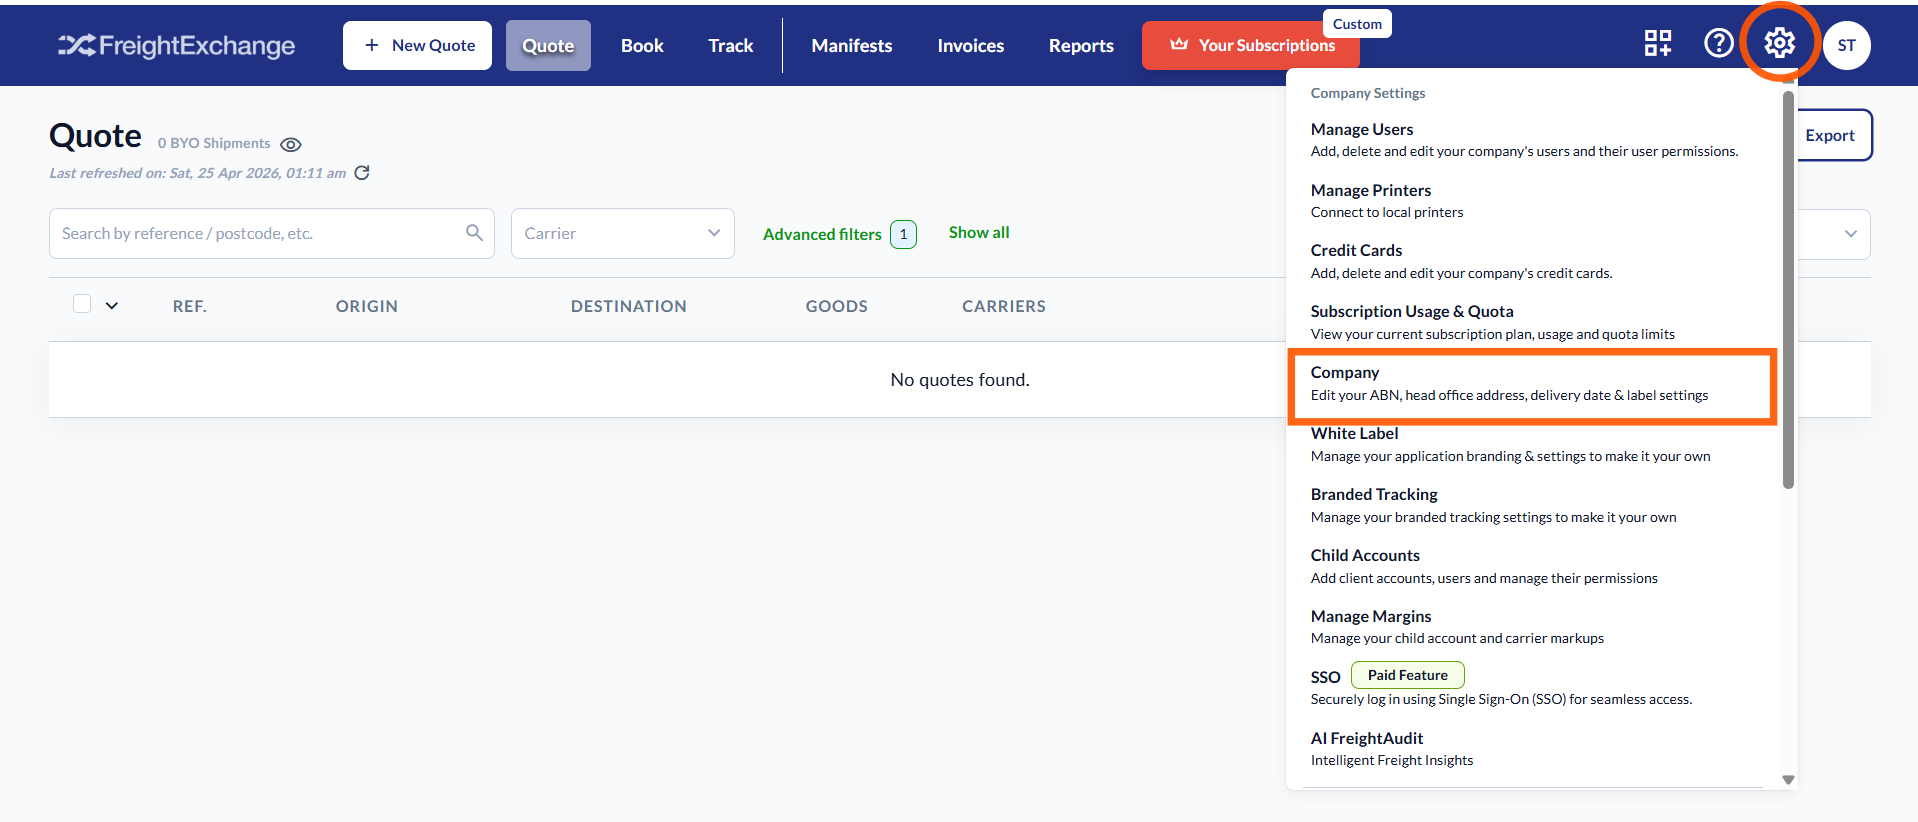
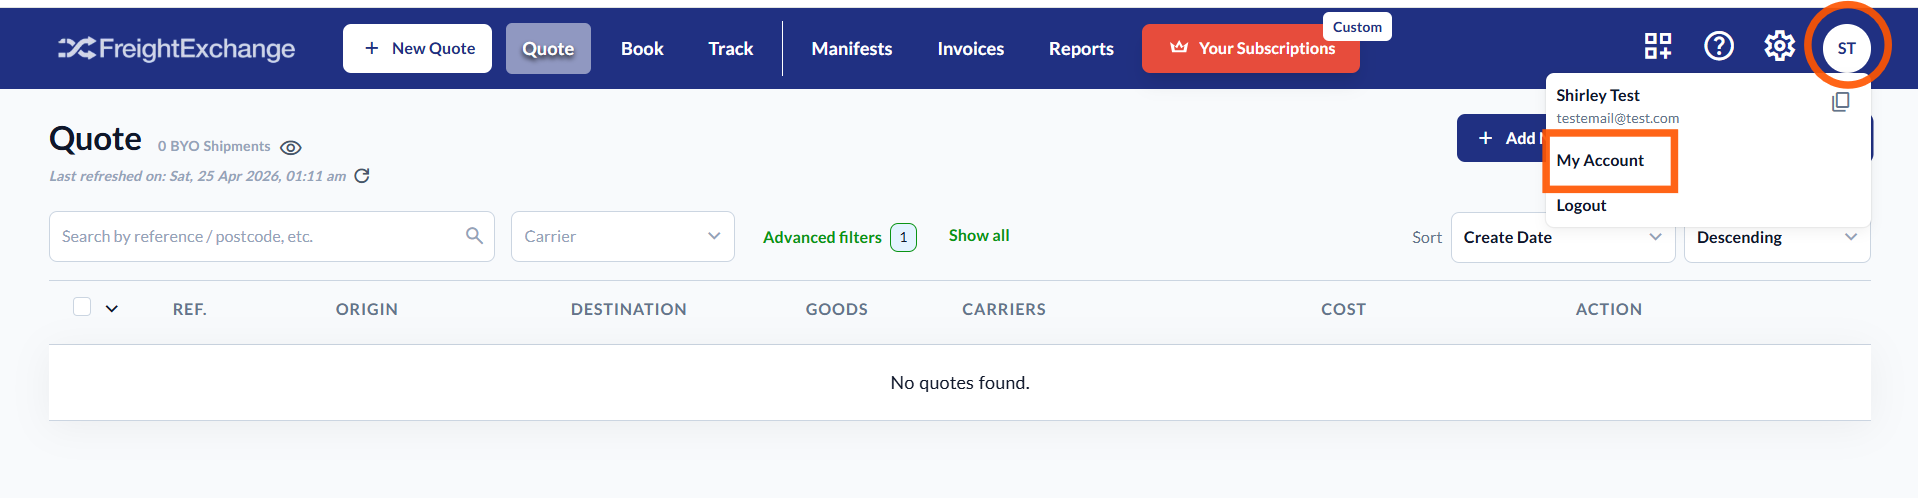
- Click on the gear icon and choose "Company". Alternatively, you can click your user initials, choose "My Account" then choose "Company" under Company Settings.
- The Company Settings page will be displayed. Update the information, as needed.
- Company profile
- FreightExchange Customer ID - system-generated upon sign up
- ABN field will be available for update only if you have not indicated this at the time of registration
- Company Name will be showing what you have indicated at the time of registration.
- Default pickup address - can be added manually or chosen from your address book
- Carriers and rates
- Show FreightExchange carriers and rates - When this is on, your team sees our negotiated carrier rates alongside your own carriers. Turn it off if you only want to use the carrier accounts you have connected yourself.
- Offer Transit Warranty - When this is on, your team can add Transit Warranty when booking with our carriers. Transit Warranty is not available for your own connected carriers, so you will need to arrange cover for those directly.
- Depot Radius - Give your receivers the option to collect their consignment from a nearby carrier depot instead of a home or business delivery. We only offer depot collection when a depot is within this distance of the delivery address. A bigger radius gives more depot options, but your receiver may need to travel further to collect.
- Booking and references
- Consolidate jobs - When this is on, we combine jobs that share the same pickup address, delivery address and carrier into one job. This can reduce the number of pickups and help lower costs.
- Enable delivery date - When this is on, your team can ask for a specific delivery date when booking. Carriers will try to meet it, but delivery dates are not guaranteed.
- Reference requirements - Add up to three (3) references to your bookings. Give each reference field a name that makes sense to your team, such as “PO number” or “Order ID”. Turn on Mandatory if a quote should not go through without it.
- Labels and documents
- Send label emails - When this is on, we email the labels to the person who made the booking as soon as it is created. Turn it off if labels already come into your own system.
- Receive ZPL labels - Turn this on if you print on thermal label printers. We will send labels in ZPL format to the webhook URL you have indicated, ready to print.
- Shipping documents webhook URL - enter the full web address (starting with https://) where we should send the labels and documents so it can be received into your system. Your system needs to reply with an HTTP 200 status for each update to confirm it received it. The API documentation shows the event format.
- Shipping documents webhook URL - enter the full web address (starting with https://) where we should send the labels and documents so it can be received into your system. Your system needs to reply with an HTTP 200 status for each update to confirm it received it. The API documentation shows the event format.
- Tracking
- Send tracking emails - When this is on, we email the receiver with updates as their shipment moves, such as when it is picked up and delivered.
- Tracking webhook URL - enter the full web address (starting with https://) where we should send the tracking updates so it can be received into your system. Your system needs to reply with an HTTP 200 status for each update to confirm it received it. The API documentation shows the event format.
- Company profile
- Click "Save changes".
Step by Step Guide in Pictures
To access your company setup:
1. Click on the gear icon and choose "Company".
Alternatively, you can click your user initials, choose "My Account" then choose "Company" under Company Settings.
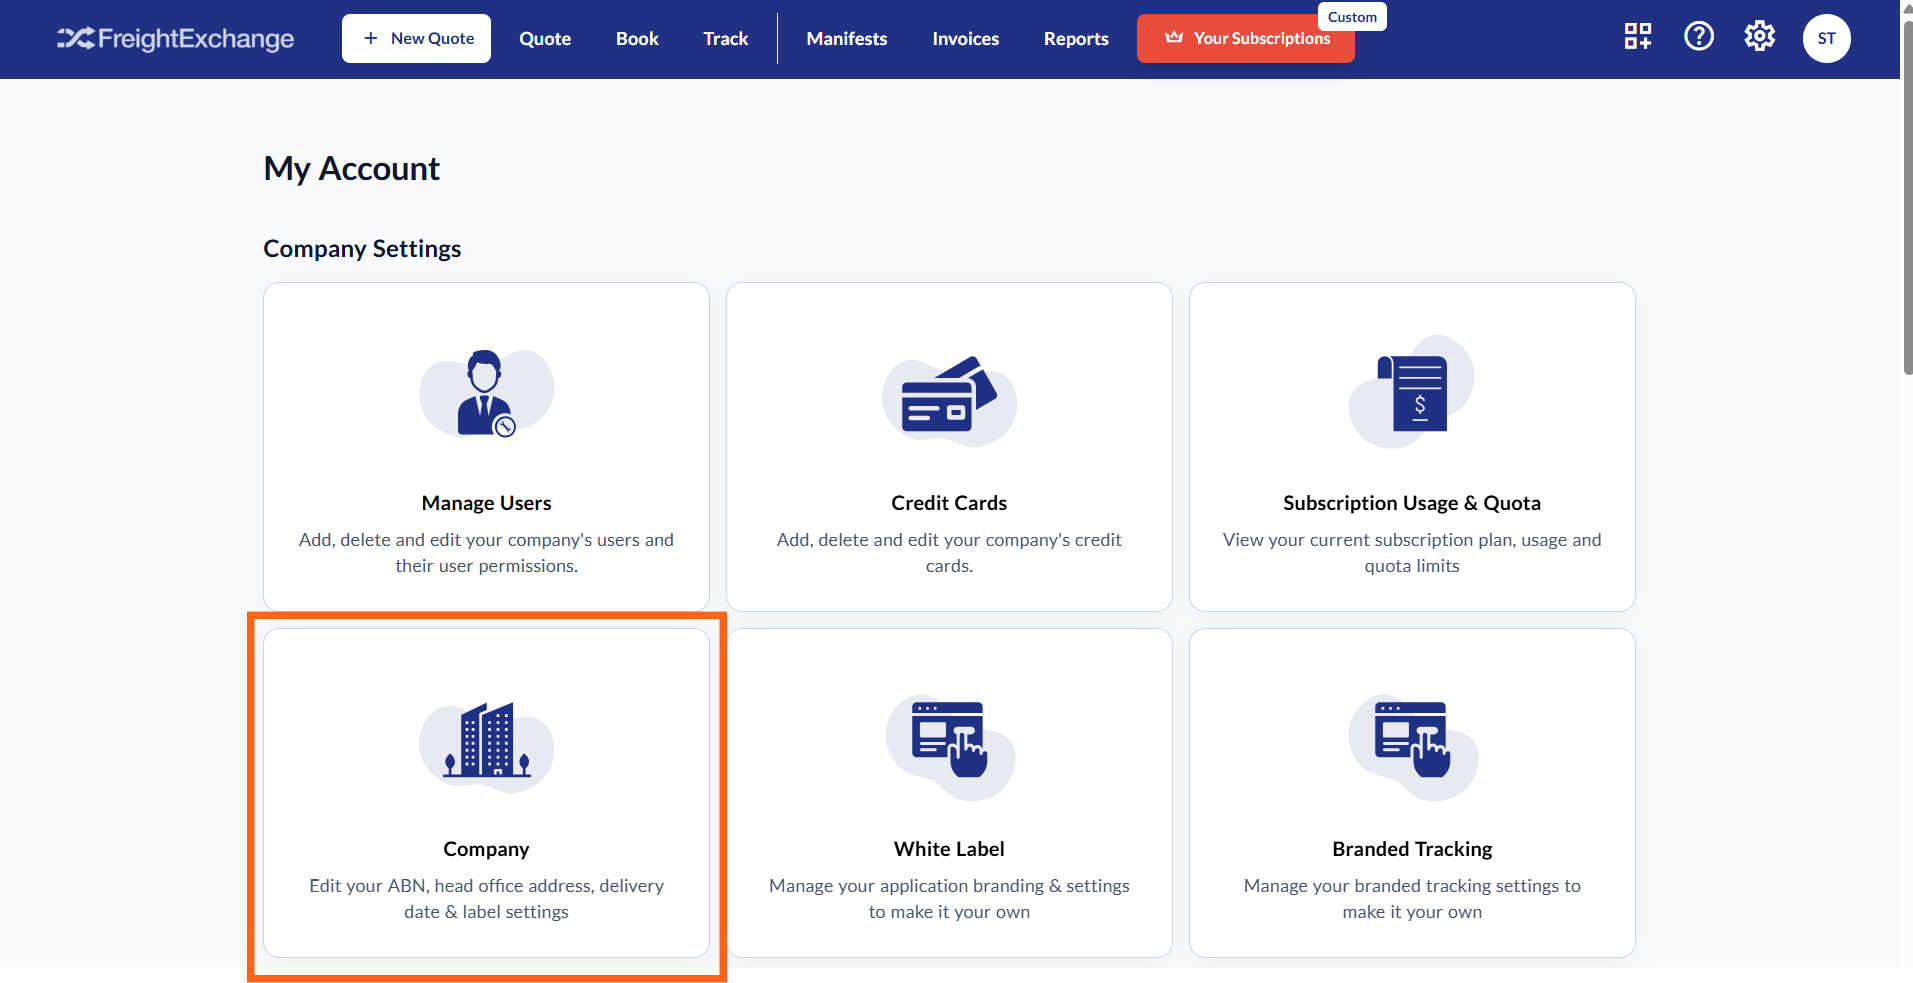
2. The Company Settings page will be displayed. Update the information, as needed.
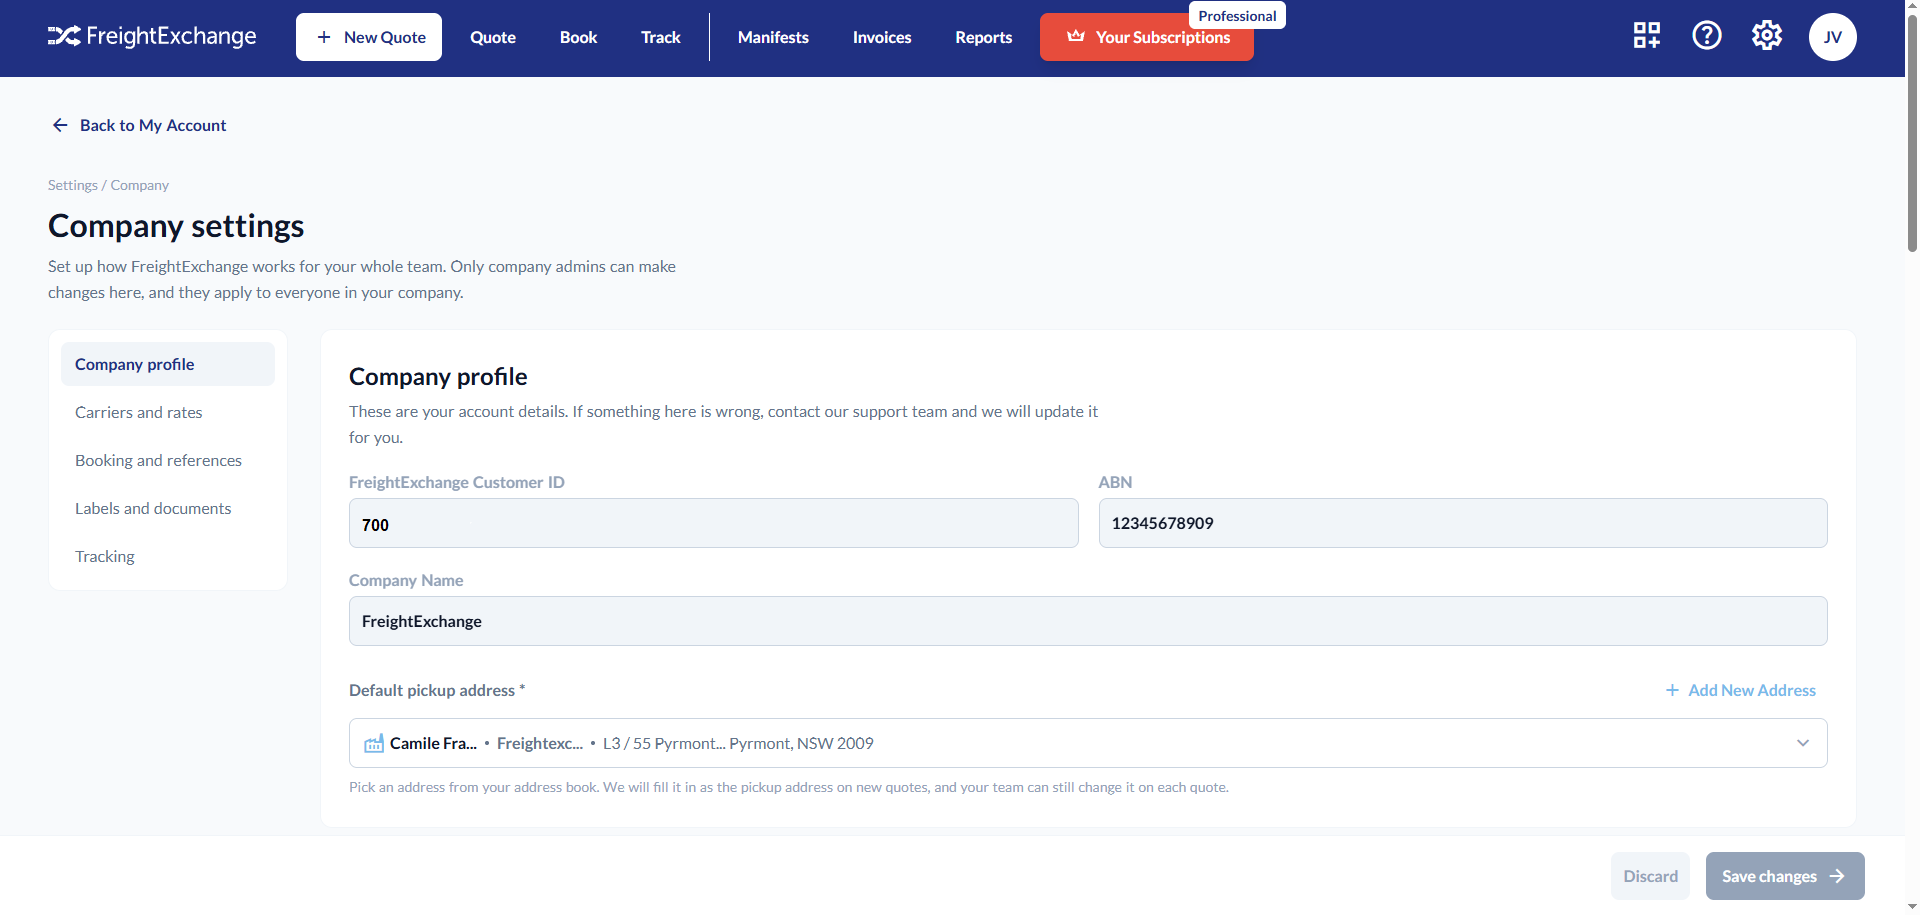
- Company profile
- FreightExchange Customer ID - system-generated upon sign up
- ABN field will be available for update only if you have not indicated this at the time of registration
- Company Name will be showing what you have indicated at the time of registration.
- Default pickup address - can be added manually or chosen from your address book
- Carriers and rates
- Show FreightExchange carriers and rates - When this is on, your team sees our negotiated carrier rates alongside your own carriers. Turn it off if you only want to use the carrier accounts you have connected yourself.
- Offer Transit Warranty - When this is on, your team can add Transit Warranty when booking with our carriers. Transit Warranty is not available for your own connected carriers, so you will need to arrange cover for those directly.
- Depot Radius - Give your receivers the option to collect their consignment from a nearby carrier depot instead of a home or business delivery. We only offer depot collection when a depot is within this distance of the delivery address. A bigger radius gives more depot options, but your receiver may need to travel further to collect.
- Booking and references
- Consolidate jobs - When this is on, we combine jobs that share the same pickup address, delivery address and carrier into one job. This can reduce the number of pickups and help lower costs.
- Enable delivery date - When this is on, your team can ask for a specific delivery date when booking. Carriers will try to meet it, but delivery dates are not guaranteed.
- Reference requirements - Add up to three (3) references to your bookings. Give each reference field a name that makes sense to your team, such as “PO number” or “Order ID”. Turn on Mandatory if a quote should not go through without it.
- Labels and documents
- Send label emails - When this is on, we email the labels to the person who made the booking as soon as it is created. Turn it off if labels already come into your own system.
- Receive ZPL labels - Turn this on if you print on thermal label printers. We will send labels in ZPL format to the webhook URL you have indicated, ready to print.
- Shipping documents webhook URL - enter the full web address (starting with https://) where we should send the labels and documents so it can be received into your system. Your system needs to reply with an HTTP 200 status for each update to confirm it received it. The API documentation shows the event format.
- Shipping documents webhook URL - enter the full web address (starting with https://) where we should send the labels and documents so it can be received into your system. Your system needs to reply with an HTTP 200 status for each update to confirm it received it. The API documentation shows the event format.
- Tracking
- Send tracking emails - When this is on, we email the receiver with updates as their shipment moves, such as when it is picked up and delivered.
- Tracking webhook URL - enter the full web address (starting with https://) where we should send the tracking updates so it can be received into your system. Your system needs to reply with an HTTP 200 status for each update to confirm it received it. The API documentation shows the event format.
3. Click "Save changes".

Was this article helpful?
That’s Great!
Thank you for your feedback
Sorry! We couldn't be helpful
Thank you for your feedback
Feedback sent
We appreciate your effort and will try to fix the article